Exchange Sub-Accounts
This guide explains why sub-accounts matter for automated trading and walks you through creating them on each exchange supported by Tradleware.
Why Use Sub-Accounts?
When running automated bots, it is critical to isolate your bot’s capital from your main trading account:
- Risk containment — a misconfigured bot can only touch the funds you explicitly assign to it
- No cross-strategy interference — each strategy operates on its own pool of capital
- Easy auditing — track bot P&L independently of your manual trades
- API key isolation — if a bot’s API key is ever compromised, your main account stays safe
Tradleware is designed to work with one bot per sub-account. Each bot YAML entry maps to one sub-account with its own API key.
OKX

Create a Sub-Account
- Log in to OKX
- Go to Account → Sub-accounts → Create Sub-Account
- Choose API trading as the account type
- Set a name (e.g.
tradleware-btc) and a password - Fund the sub-account by transferring USDT (or your stablecoin) from your main account
Create an API Key for the Sub-Account
- Switch into the sub-account context (top-right account switcher)
- Go to Account → API → Create API Key
- Set permissions: Trade only — do NOT enable Withdraw
- Whitelist your Tradleware server’s IP address for extra security
- Note down the API Key, Secret Key, and Passphrase
YAML Configuration
# bot_configs/crypto/okx.yaml
bots:
  - id: mybtcbot
    api_key: YOUR_API_KEY
    secret_key: YOUR_SECRET_KEY
    passphrase: YOUR_PASSPHRASE
    hostname: www.okx.com
    stablecoin_fiat_pair: USDT/USD  # set to your local currency pair, e.g. USDT/EUR
    crypto_stablecoin_pair: BTC/USDT
    tradleware_api_key: SOME_RANDOM_PER_BOT_KEY  # Webhook auth key — generate with: openssl rand -hex 32
# Generate a secure tradleware_api_key:
openssl rand -hex 32Crypto.com

Create a Sub-Account
- Log in to Crypto.com Exchange
- Go to Account → Sub-accounts → Create Sub-Account
- Choose a label (e.g.
tradleware-eth) and complete verification if prompted - Transfer funds to the sub-account via the internal transfer feature
Create an API Key
- Switch into the sub-account
- Go to Settings → API Management → Create API Key
- Enable Spot Trading only — leave Withdrawal disabled
- IP-whitelist your Tradleware server
- Copy the Client ID (API key) and Secret Key
YAML Configuration
# bot_configs/crypto/cryptocom.yaml
bots:
- id: myethbot
api_key: YOUR_CLIENT_ID
secret_key: YOUR_SECRET_KEY
hostname: api.crypto.com
stablecoin_fiat_pair: USDT/USD # set to your local currency pair, e.g. USDT/EUR
crypto_stablecoin_pair: ETH/USDT
tradleware_api_key: SOME_RANDOM_PER_BOT_KEY # Webhook auth key — generate with: openssl rand -hex 32# Generate a secure tradleware_api_key:
openssl rand -hex 32Coinbase
Coinbase Advanced Trade does not expose API sub-accounts the same way OKX or Crypto.com do. The workflow is slightly different:
- Create a dedicated portfolio for each Tradleware bot
- Use the portfolio name as the bot label in your own tracking
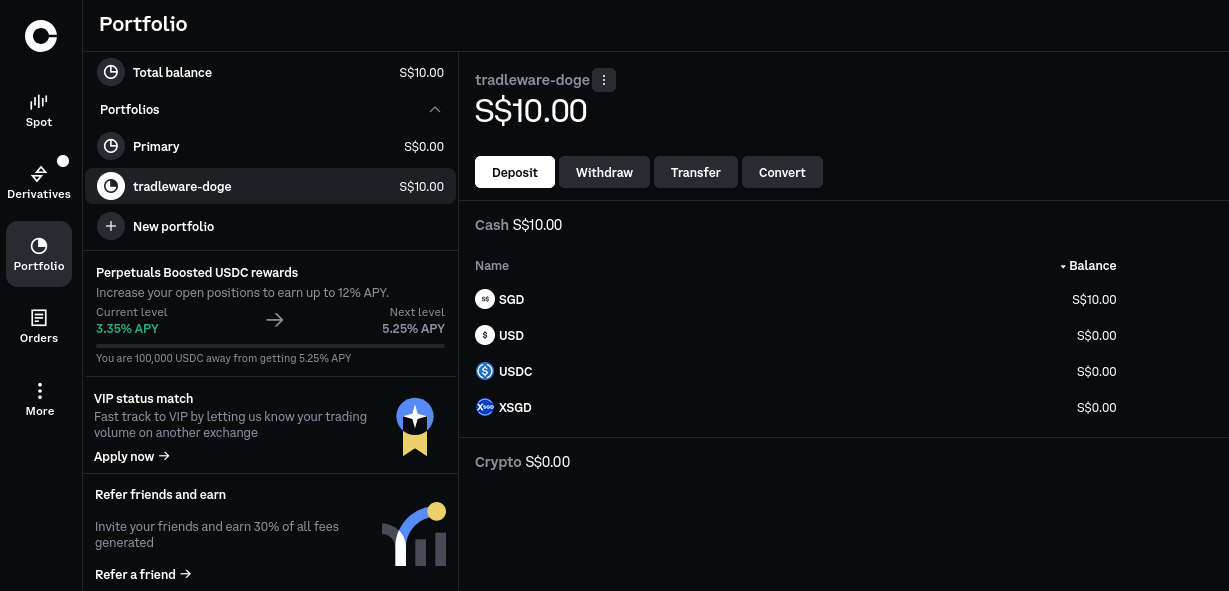
1. Create the Portfolio
The screenshot you shared shows the portfolio creation screen. Use these settings for a dedicated Tradleware portfolio:
2. Generate the API Key Pair
Generate the CDP API key pair for that portfolio.
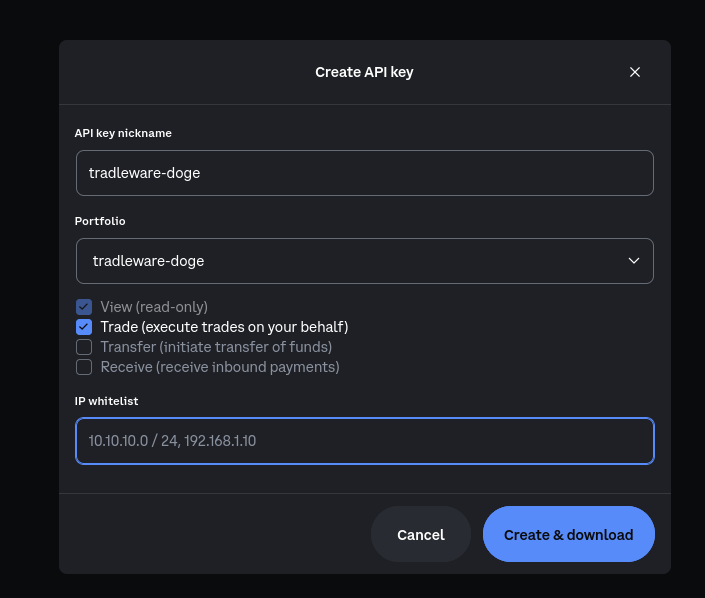
- Nickname:
tradleware-doge - Portfolio:
tradleware-doge - View: on
- Trade: on
- Transfer: off
- Receive: off
Leave the IP whitelist blank for now if you are still setting things up. That allows all IPs temporarily, which is fine during initial configuration. You can whitelist your Tradleware server IP later once you know its static address.
When the settings match, click Create & download.
name— this is your API key identifier. Copy the full string, including theorganizations/.../apiKeys/...path.privateKey— this is the PEM-formatted private key, starting with-----BEGIN EC PRIVATE KEY-----.
The important detail is the \n newlines inside privateKey. They must be preserved exactly as they appear in the downloaded JSON file.
# bot_configs/crypto/coinbase.yaml
bots:
- id: mydogebot
api_key: organizations/YOUR_ORG_ID/apiKeys/YOUR_KEY_ID
secret_key: "-----BEGIN EC PRIVATE KEY-----\nYOUR_KEY\n-----END EC PRIVATE KEY-----\n"
hostname: api.coinbase.com
crypto_stablecoin_pair: DOGE/USDT
tradleware_api_key: SOME_RANDOM_PER_BOT_KEY
# subaccount_name: "My DOGE Bot" # Optional dashboard label only.
# Coinbase does NOT support subaccounts via the API, so this does not
# affect trading or authentication.# Copy the Coinbase template first:
cp bot_configs/crypto/coinbase.yaml.example bot_configs/crypto/coinbase.yaml4. Final checks
Before you move on, confirm these points:
- The portfolio is created with the correct name
ViewandTradeare enabledTransferandReceiveare disablednameis copied toapi_keyprivateKeyis copied tosecret_keywith the newline formatting preserved- The CDP API key pair was generated for the correct portfolio
- The JSON fields were mapped into the Tradleware YAML correctly
hostnameisapi.coinbase.comcrypto_stablecoin_pairmatches the pair you want to tradetradleware_api_keyis a strong random secret
Independent Reserve

Independent Reserve does not offer sub-accounts. Instead, you create a dedicated API key scoped to trading only.
Create an API Key
- Log in to Independent Reserve
- Go to Settings → API Keys → Generate New API Key
- Enable permissions: Place orders, Cancel orders, Get account information
- Leave Withdraw funds unchecked
- Copy the API Key and API Secret
YAML Configuration
# bot_configs/crypto/ir.yaml
bots:
- id: myxbtbot
api_key: YOUR_API_KEY
secret_key: YOUR_API_SECRET
hostname: api.independentreserve.com
stablecoin_fiat_pair: USDT/SGD
crypto_stablecoin_pair: XBT/SGD
tradleware_api_key: SOME_RANDOM_PER_BOT_KEY # Webhook auth key — generate with: openssl rand -hex 32# Generate a secure tradleware_api_key:
openssl rand -hex 32Kraken

Kraken does not offer sub-accounts. Instead, you create a dedicated API key scoped to trading only. There is no passphrase — Kraken authentication uses just the API key and secret.
Create an API Key
- Log in to Kraken Pro
- Go to Account (top-right) → Security → Connections & API
- Click Create API key (top-right of the page)
- Give it a descriptive name — e.g.
tradleware - Under Funds permissions, enable Query only — leave Deposit, Withdraw, and Earn unchecked
- Under Orders and trades, enable all four: Query open orders & trades, Query closed orders & trades, Create & modify orders, and Cancel & close orders
- Under Data, enable Query ledger entries — leave Export data unchecked
- Leave IP address restriction off for initial setup; enable and whitelist your Tradleware server IP once running
- Leave Key expiration, Query start/end dates, and Custom nonce window at their defaults (Off)
- Click Generate key
The screenshot below shows the correct permission set:
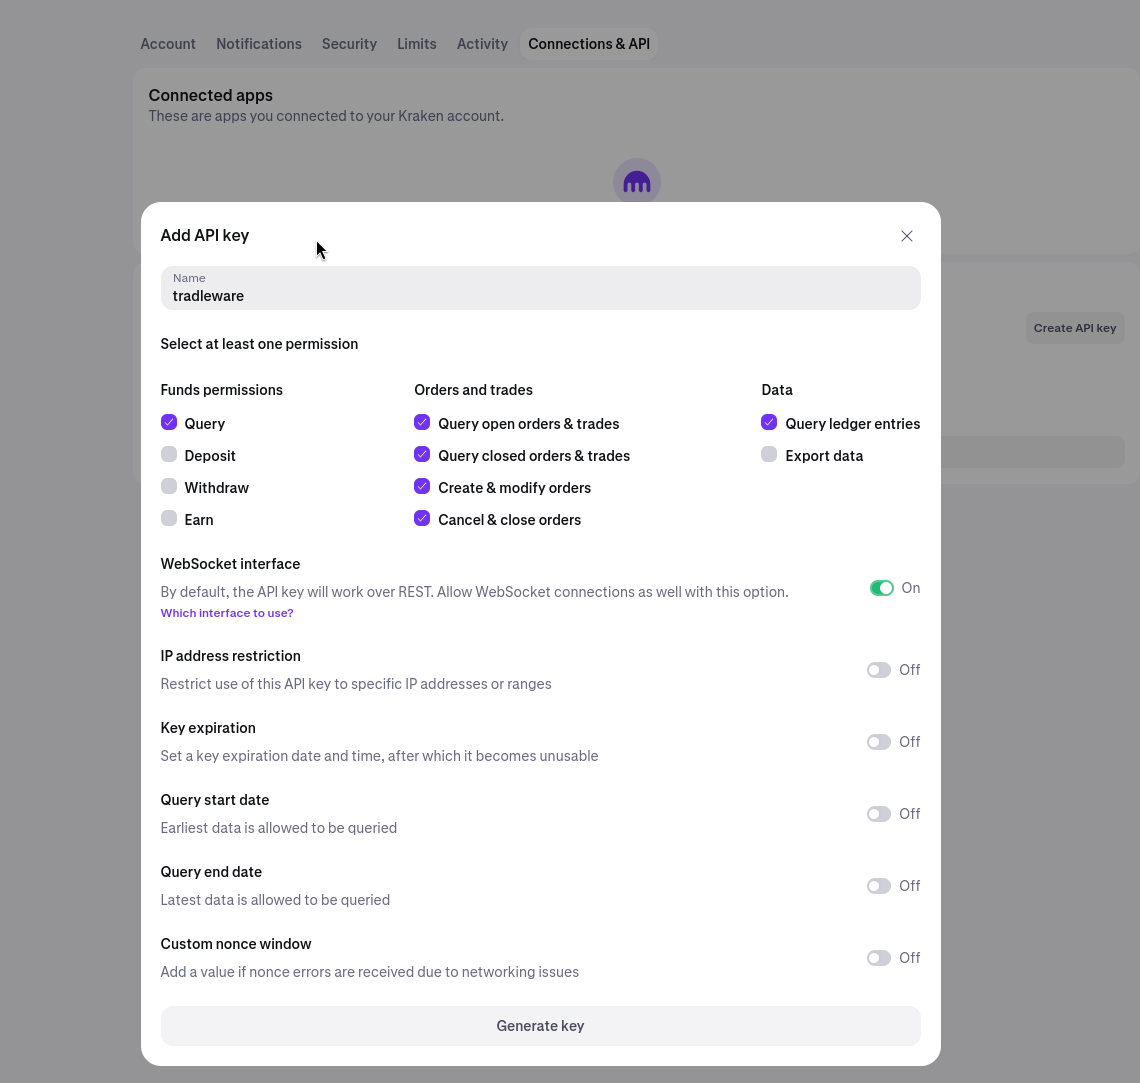
Important: Copy both the API Key and Private Key immediately after generation — Kraken only shows the private key once.
YAML Configuration
# bot_configs/crypto/kraken.yaml
bots:
- id: mykrakenbot
api_key: YOUR_API_KEY
secret_key: YOUR_PRIVATE_KEY
# No passphrase needed — Kraken does not use one
# hostname is optional; defaults to api.kraken.com
stablecoin_fiat_pair: USDT/USD # set to your local currency pair, e.g. USDT/EUR
crypto_stablecoin_pair: BTC/USDT
tradleware_api_key: SOME_RANDOM_PER_BOT_KEY # Webhook auth key — generate with: openssl rand -hex 32# Copy the Kraken template first:
cp bot_configs/crypto/kraken.yaml.example bot_configs/crypto/kraken.yaml
# Generate a secure tradleware_api_key:
openssl rand -hex 32Binance

Binance supports true sub-accounts via a virtual email system. Each sub-account gets a Binance-generated virtual email address and its own independent API key pair — entirely separate from your main account credentials.
Step 1 — Create a Sub-Account
- Log in to Binance with your main account
- Go to Sub Accounts → Account Management
- Click + Create Sub Account (top-right)
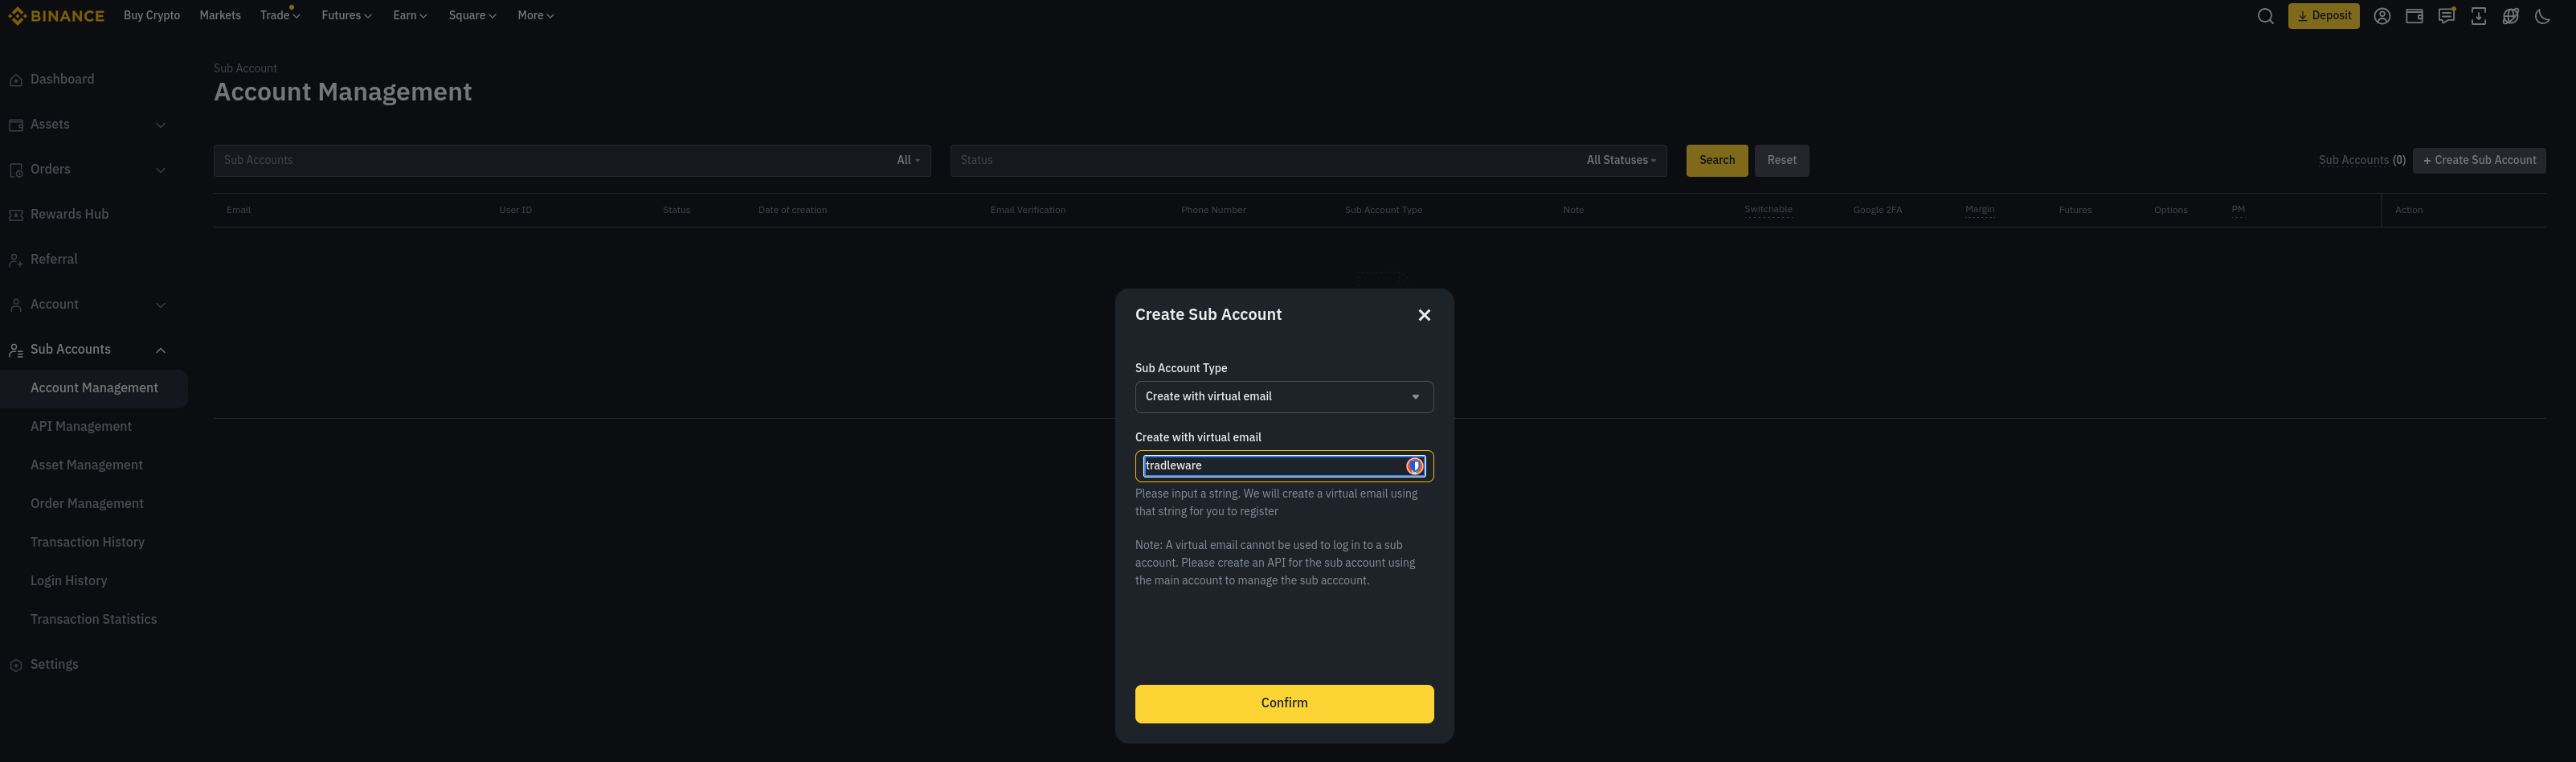
- Set Sub Account Type to Create with virtual email
- Enter a label string — e.g.
tradleware. Binance will generate a virtual email from it (e.g.tradleware_virtual@...) - Click Confirm
Step 2 — Create an API Key for the Sub-Account
- Go to Sub Accounts → API Management
- Select the sub-account you just created from the Sub Accounts dropdown
- Enter an API Key Label — e.g.
tradleware - Click Next
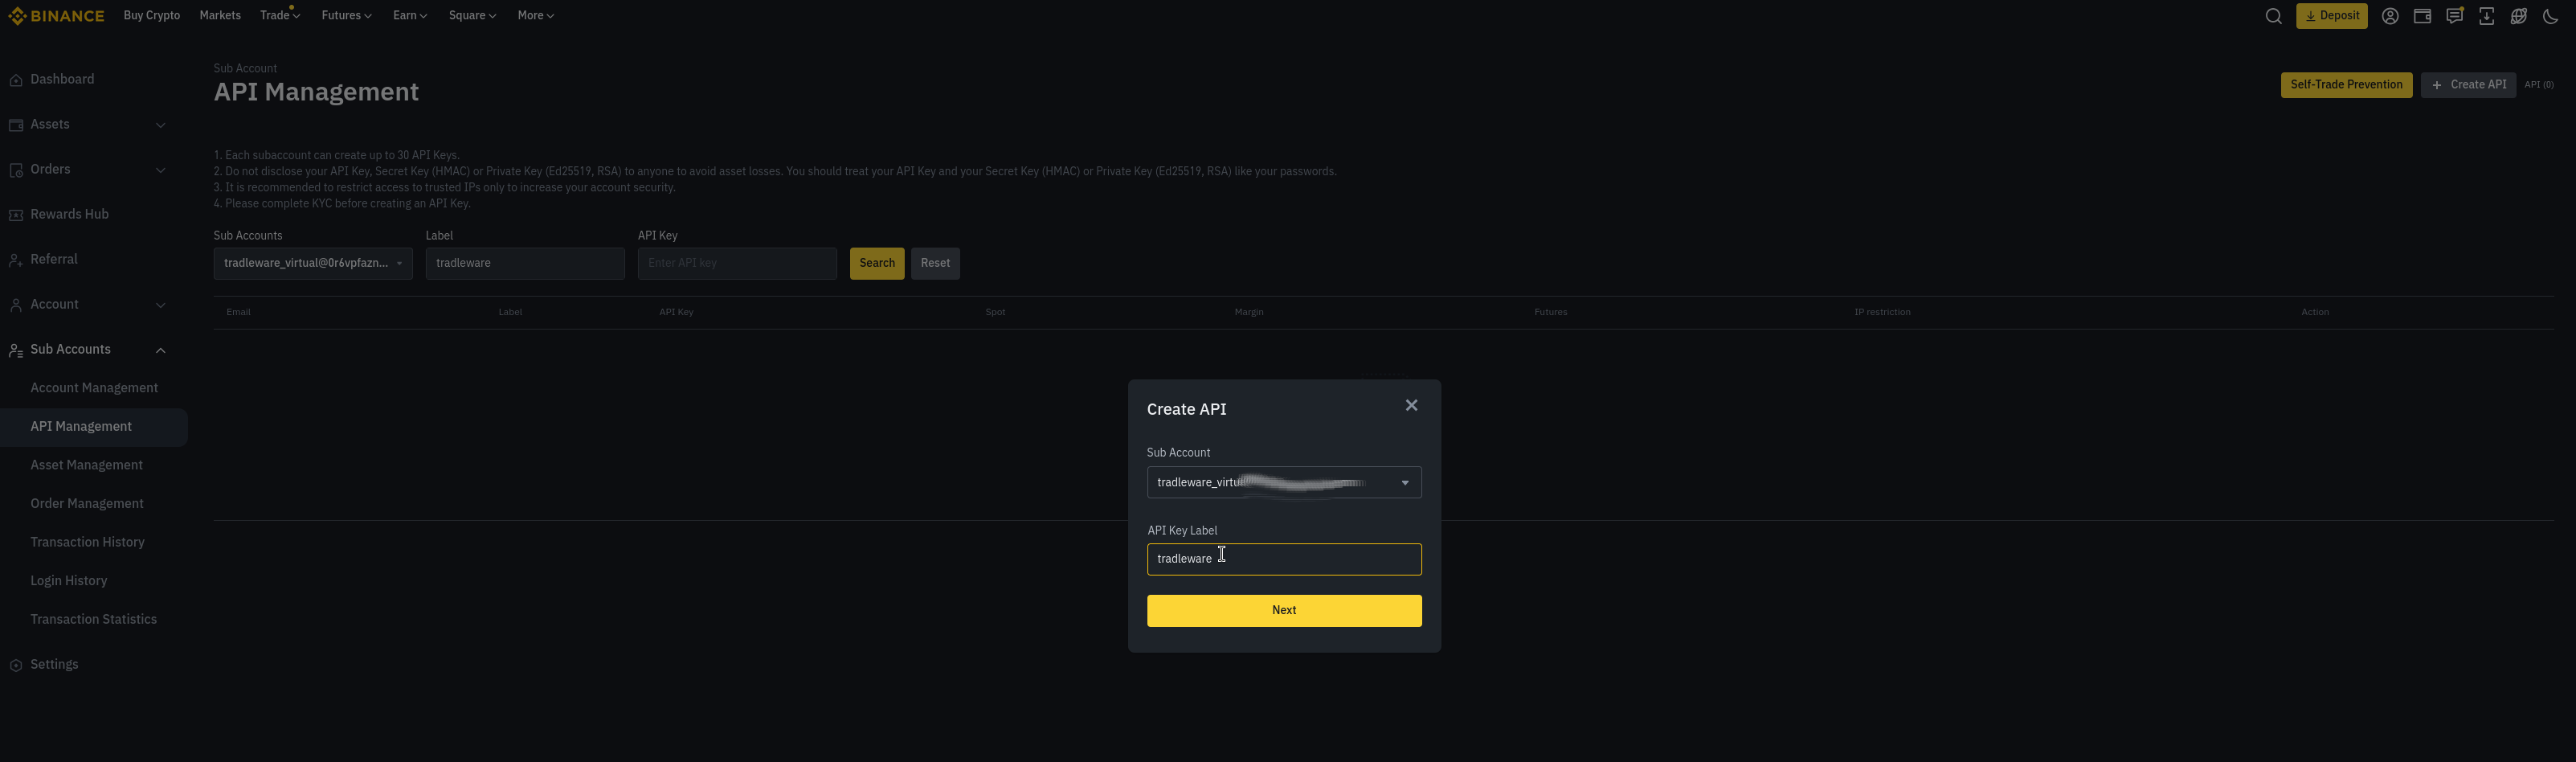
On the next screen, you will be asked to set permissions and IP restrictions.
⚠️ IP whitelisting is mandatory to enable trading. Binance does not allow spot trading permissions on sub-account API keys unless at least one IP address is whitelisted. Add your Tradleware server’s static IP before enabling the Enable Spot & Margin Trading permission.
Set the following permissions:
- Enable Reading — on
- Enable Spot & Margin Trading — on (only available after adding a whitelisted IP)
- Enable Withdrawals — leave off
Copy the API Key and Secret Key immediately — the secret is only shown once.
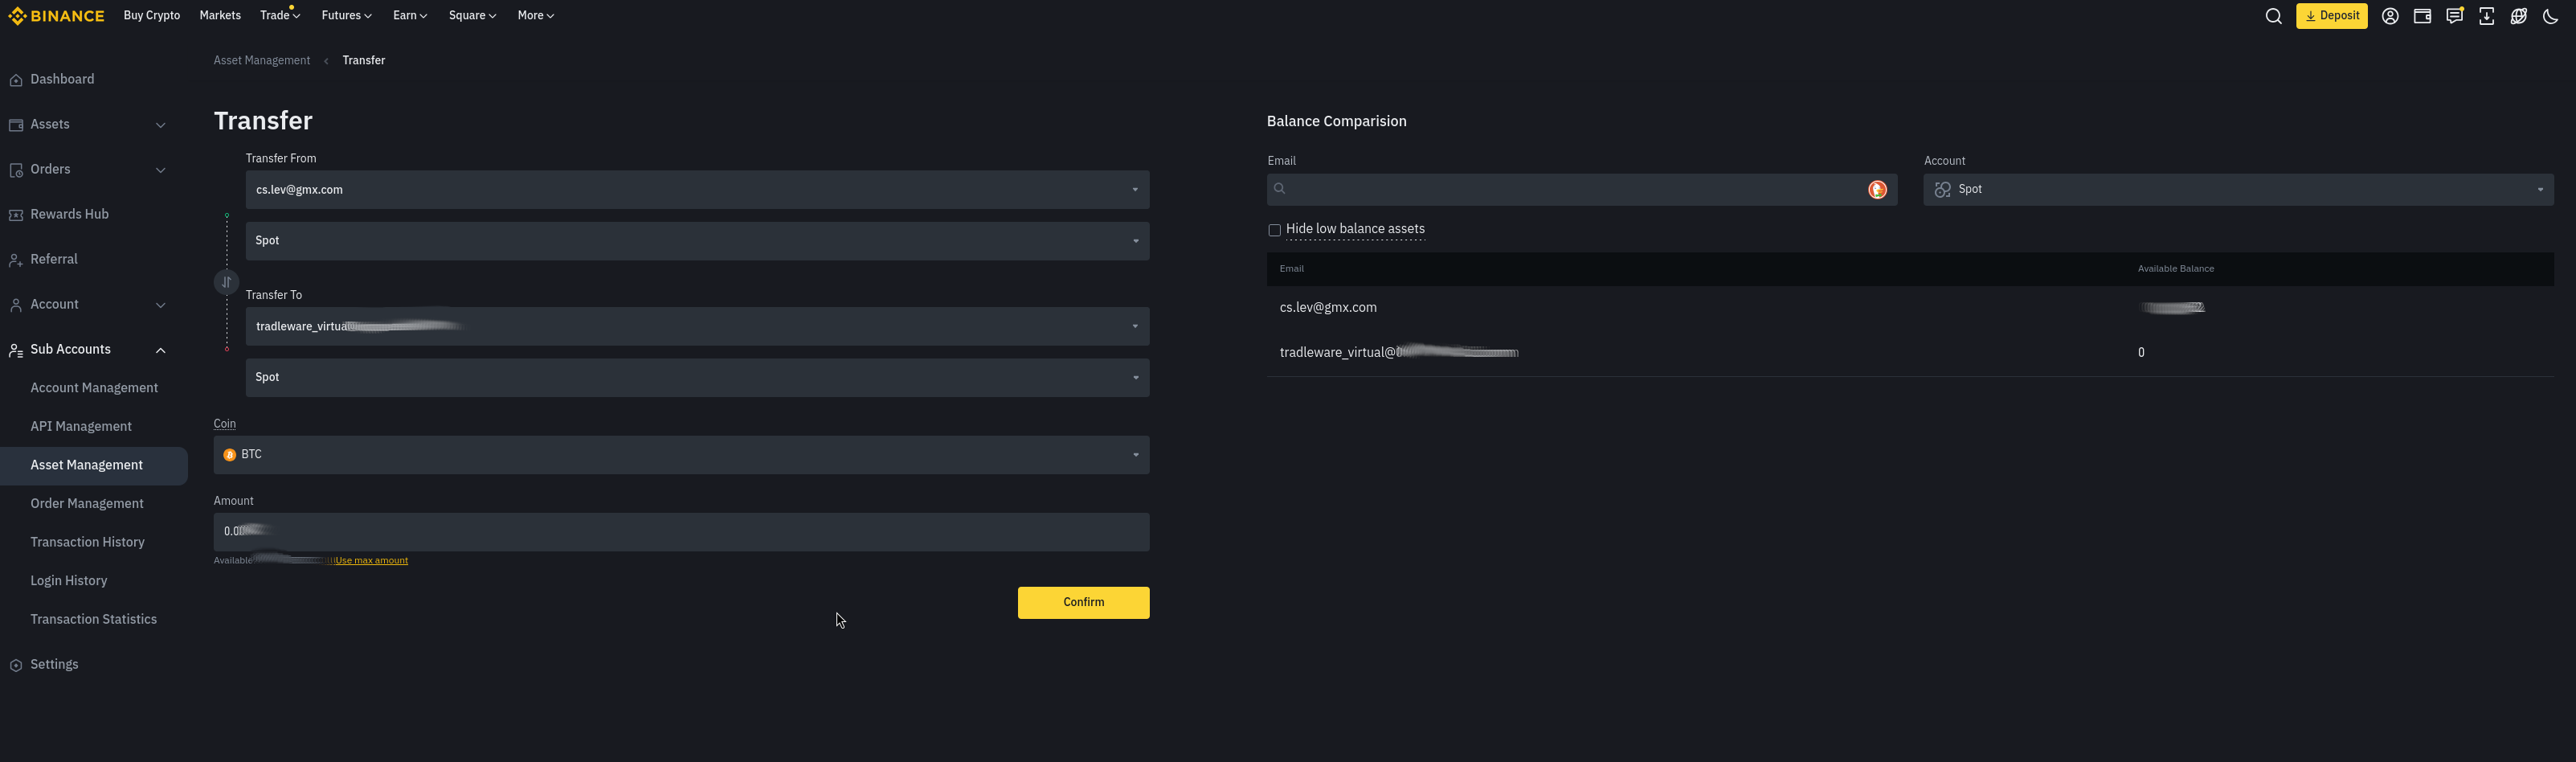
Step 3 — Fund the Sub-Account
Transfer funds from your main account’s Spot wallet to the sub-account:
- Go to Sub Accounts → Asset Management → Transfer
- Set Transfer From to your main account (Spot)
- Set Transfer To to the sub-account (Spot)
- Choose the coin and amount, then click Confirm
YAML Configuration
Each Binance bot entry uses the sub-account’s own API key and secret. No passphrase is needed.
# bot_configs/crypto/binance.yaml
bots:
- id: mybtcbot
api_key: YOUR_SUBACCOUNT_API_KEY
secret_key: YOUR_SUBACCOUNT_SECRET_KEY
# No passphrase — Binance does not use one
# hostname is optional; defaults to api.binance.com
# hostname: api.binance.us # Binance.US users: uncomment this line
stablecoin_fiat_pair: USDT/USD # set to your local currency pair, e.g. USDT/SGD
crypto_stablecoin_pair: BTC/USDT
tradleware_api_key: SOME_RANDOM_PER_BOT_KEY # Webhook auth key — generate with: openssl rand -hex 32# Copy the Binance template first:
cp bot_configs/crypto/binance.yaml.example bot_configs/crypto/binance.yaml
# Generate a secure tradleware_api_key:
openssl rand -hex 32Multiple sub-accounts: Add a separate bot entry for each sub-account, each with its own
api_keyandsecret_key. Tradleware treats them as entirely independent bots.
Interactive Brokers (IBKR)

Interactive Brokers is a globally licensed TradFi broker and the only stock/options broker currently integrated in Tradleware’s lineup, providing professional-grade execution across global markets. Unlike the crypto exchanges, IBKR does not expose a REST API — instead, it uses the proprietary TWS API exposed via a local gateway process.
To make this work on any architecture, including ARM-based Raspberry Pi, I custom-built and maintain cslev/ibkr-docker — a containerized IB Gateway that supports both linux/amd64 and linux/arm64. This means you get a fully headless, one-command IBKR gateway running on the same Raspberry Pi as the rest of your trading stack, with zero desktop environment required.
Config split: IBKR configuration lives in two separate files:
bot_configs/stock/ibkr.yaml— Tradleware bot settings (account, symbol, API key, market hours).env.ibkr— IB Gateway container credentials (IBKR login, trading mode). Not read by Tradleware — only used bydocker-compose.ibkr.yml
Step 1 — Create Your IBKR Account
For development and testing, always start with a Paper Trading account:
- Log in to IBKR Client Portal
- Go to Settings → Paper Trading Account → request paper account
- For live trading, use your real funded account — ideally a dedicated individual account used exclusively for automated execution
IBKR does not support sub-accounts in the same way as crypto exchanges. Capital isolation is achieved by using a dedicated account and by setting IBC_ReadOnlyApi=yes during initial testing (no orders will be placed).
Step 2 — Configure the IB Gateway
cp bot_configs/stock/ibkr.yaml.example bot_configs/stock/ibkr.yaml
cp .env.ibkr.example .env.ibkr
Edit .env.ibkr with your IBKR credentials:
USERNAME=your_ibkr_username
PASSWORD=your_ibkr_password

# Trading mode: 'paper' or 'live'
IBC_TradingMode=paper

# Read-only API: 'yes' = no orders placed (safe for initial testing)
IBC_ReadOnlyApi=yes
Step 3 — Start the IB Gateway Container
docker-compose -f docker-compose.ibkr.yml up -dThe cslev/ibkr-docker image handles automatic internal port routing — always connect to port 8888 regardless of whether you are using paper or live mode. When switching to live, only change IBC_TradingMode=live in .env.ibkr and restart; no port changes needed.
Check gateway logs to confirm it connected to IBKR servers:
docker-compose -f docker-compose.ibkr.yml logs -fYou can also monitor the gateway visually in your browser (no VNC client needed) at http://YOUR_PI_IP:6080.
Step 4 — YAML Configuration
# bot_configs/stock/ibkr.yaml
gateway:
  host: "ib_gateway"   # Docker container name — resolves via tradleware-network DNS
  port: 8888           # Always 8888 — cslev/ibkr-docker handles internal routing

bots:
  - id: myapplebot
    account_id: "U1234567"
    symbol: "AAPL"
    extended_hours: false
    fractional_shares: false  # Not all symbols support this; IBKR rejects unsupported requests
    tradleware_api_key: "your_tradleware_api_key_here"  # Webhook auth key — generate with: openssl rand -hex 32
# Generate a secure tradleware_api_key:
openssl rand -hex 32Step 5 — Start Tradleware
Once the gateway is up, start the main stack:
docker-compose up -dTradleware reads bot_configs/stock/ibkr.yaml and automatically connects to the IB Gateway at ib_gateway:8888 via the shared Docker network.
account_id— your IBKR account number (found in Client Portal → Settings)symbol— the ticker symbol exactly as IBKR recognizes itextended_hours— settrueto allow pre-market and after-hours trading
Security Best Practices
- Never enable Withdraw permissions on any API key used by Tradleware
- Always IP-whitelist your Tradleware server’s public IP on every exchange
- Rotate API keys periodically and update your YAML configs accordingly
- Use separate keys per bot — Tradleware’s
tradleware_api_keyensures one leaked key can’t affect your entire fleet
Next Steps
- Setup Tradleware — you now have your API keys ready to drop into the bot YAML configs
- Set up TradingView webhooks to start sending signals to your bots